Saturday, October 31, 2009

Rhinebeck, and my post-Rhinebeck vacation

I've been having so much fun going places and making things that I haven't had a chance to update the blog. It's time to catch up.

So…two weekends ago I got to go to the NY Sheep and Wool Festival. I have family in Massachusetts, just two hours away from the festival, so I got to have a great visit, and bring some of them to Rhinebeck with me. My focus this year was on spinning and dyeing.My plan was to buy some natural dyes, and some wool and yarn to use them on. But not yarn … I tried really hard to resist the gorgeous yarns, and amazingly enough, I pulled it off. (The bags bulging with wool top and roving did help me restrain myself. In fact, I only bought one thing that wasn’t on my shopping list, this beautiful cherry case to hold a sock-in-progress:


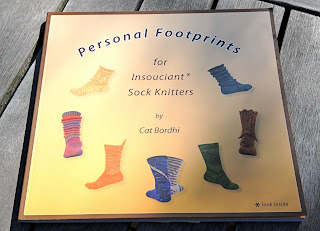
Since I didn’t know that such a thing existed before I saw it at Rhinebeck, I couldn’t very well have put it on my list, could I? One thing that was definitely on my list was the new Cat Bordhi sock book – I haven’t tried her latest method out yet, because I’m already in the middle of a pair of Cookie A socks, but I’ll definitely use Cat’s book for my next pair.
With help from the Ravelry discussion boards, I found a couple of vendors selling natural dye materials, and chose some kits of Earthues dyes from Long Ridge Farm. I got two kits – one containing osage orange, quebracho, and logwood, and the other an “overdyeing kit” containing indigo, cochineal, and pomegranate. Once the dyes were in my bag, I started focusing on fibers to use them on – eventually buying two skeins of fingering weight alpaca, 2 pounds of rambouilllet top, and about a pound and a half of wool roving of different breeds.

And these bags of “wool” – they’re actually maple cotton candy, and it was delicious! I did do a double-take when I first saw someone eating some of this, because it really did look like a bag of wool.
As much fun as I had at Rhinebeck, the real fun was when I got home … because I’d arranged to take the week off to play with all my new fiber goodies. For the next several days, I was free to knit, spin, and dye all day long. And I really lucked out – the weather was warm and sunny most of the time, so I was able to sit out on my back deck with my spinning wheel while I was tending the dye pots. First thing when I got back home, I went out to buy a hotplate so that I could work outdoors (by the end of the week, I’d picked up a second one so that I could have two dye pots going at once.)

Day one was devoted to mordanting the fibers I was planning to dye later in the week – heating them in an alum solution that helps hold the dye. It wasn’t until day two that I actually got to break open the dye kits. The first colors I tried were quebracho red


and logwood gray.
The quebracho made a really gorgeous warm red, definitely a color I want to repeat. As for the logwood, I ended up putting a bit more dye than I’d really intended, but it made a great dark purple. I’ve saved the dyebath to reuse, and am curious what the weaker solution that’s left will make. The next day, I used the osage orange and cochineal dyes.


I used the cochineal first on one of the skeins of alpaca from Rhinebeck, and then I reused the exhaust bath on some roving.


The yarn dyed with osage orange is half a skein of Cascade EcoWool, and undyed Peruvian wool that comes in fat 8 ounce skeins, perfect for dyeing yourself.

I think we’re up to Friday now – I dyed another skein with osage orange, so that I could overdye it with indigo later, and also dyed some roving with pomegranate.


Saturday it rained, so I spent the whole day on spinning. By the end of the week, I’d spun these three skeins (and boy did my back ache!):


Sunday was devoted to indigo dyeing, and I’ve got lots of photos, so stay tuned for my next post to see all the beautiful blues.

Sunday, August 30, 2009

A productive three-day weekend

It's been a busy and productive 3-day weekend (I took Friday off from work) -- jewelry, knitting, and spinning. Nothing finished in the knitting category, so no photos there. But here's what I've been spinning:


4 ounces of merino and bamboo top, spun into a 2-ply yarn. Handdyed by Miss Babs, purchased at Fiber Space. I haven't skeined it yet, so I don't know what the yardage is. I've got another entire 4-ounce braid of fiber left to spin. I hadn't done any spinning in quite a while, and my spinning muscles are really aching now! I'll have to give my back a rest for a few days before I tackle that other braid.

Now, the jewelry.

I started out with a beading project, using some of the brass findings that I got at BeadFest.


This is made with a brass bird charm, brass chain, aquamarine beads, and oxidized sterling silver wire.


After the necklace, I started playing with some polymer clay, inspired by a new book that I picked up at BeadFest. It's called Ancient Modern: Polymer Clay + Wire Jewelry, by Ronna Sarves Weltman. Ronna stopped by class last Sunday with some polymer clay pieces that she had made using Objects and Elements bezels, and they were so gorgeous that I couldn't resist buying her book.

Here's my first piece -- a polymer pendant with silver wire, strung (for now) on a silk cord.

I'm not sure about this one yet -- maybe a glaze coat to bring up the color would make me like it more. I think I blended the clay a little too much, so that the colors ran together and lost their vividness.

The next piece combines metal with more polymer clay, in the same color scheme, held together with a brass screw. This one's on a silk ribbon for now, as well, but I haven't really decided how to finish it off. Also, while I like the basic idea, I may redo the polymer pieces.


The final piece of finished jewelry for the weekend is a bracelet, using rubber cord, sterling silver, a brass bezel with glass bead, and sari silk. I can't really claim credit for this design, as it was published in the Handcrafted Jewelry magazine that I bought at -- BeadFest, of course. So it's not original, but it's a great design, and I already had all of the components on hand.


It's Sunday night now, and I've started in on one last piece -- but this one involves resin, so it's going to take a couple of days to get all of the layers poured and cured. Hopefully, I'll have photos for my next post.

...and finally, here are a couple of pairs of cufflinks that I actually made a couple of weeks ago, as a birthday present for my husband. One pair made with NY subway tokens, and the other with 10 franc coins -- neither of which is in circulation any more.


Saturday, August 29, 2009

BeadFest Philadelphia

Most of what I've posted here has been fiber-related -- knitting, spinning, dyeing, sewing. But this past weekend, I got to spend some time on another hobby that I haven't done much of in a while -- jewelry making.

Taking a class is always a great way to get inspired again, and that's what I did. I took a class called "Rings, Relics, and Riveting," with a wonderful teacher and jewelry artist, Susan Lenart Kazmer. The class was part of BeadFest Philadelphia, a huge bead and jewelry show with lots of classes. So on Saturday, I arrived early to check out the marketplace, where I of course spent more than I'd intended to on materials and supplies.

Then on Sunday, I had my class. Here's the course description:

Combine layers of metal sheet, objects, paper, rocks and fiber build unusual wearable rings. Focus on cold joining techniques such as riveting, prongs and staples. Add height and dimension by use of negative and positive space. Fabrication of metal by hand and tools such as disc cutters and forming block.
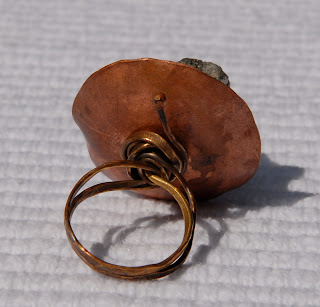
We started with a simple design that involved stringing various types of beads (loosely defined as anything that had a hole in it, or could have a hole drilled into it) onto a long piece of brass wire that was then hammered and shaped into a ring shank. Here's the result of mine, using a hammered copper disk and a chunk of hematite.


Then we started using rivets, tiny nut & bolt sets, staples, and prongs to hold rings together. I'd brought along all sorts of odd materials that I thought I might be able to add to a ring, and ended up focusing on a little bag of rocks that I'd brought back from a vacation to Prince Edward Island a few years ago. I made my first PEI rock ring with copper, a pale blue glass bead, and a silver-colored metal spacer bead:


I love the patina that the copper got from heating it with a torch, and the slightly irregular hammered edges of the metal disk. Unfortunately, though, in the process of riveting it all together, I cracked the rock. I haven't had the heart to take it apart yet, but at some point I'll probably put in a new rock to replace the cracked one.

After that, I decided to break out the expensive supplies -- a sheet of sterling silver. I made another ring very similar to the copper one, but this time I'd learned some things about how not to break the stone (give it better support in the metal disk, and don't hammer so hard on the rivet!) Here's the result:


It's kind of ridiculously huge compared to what I'd ordinarily wear as a ring, but I really like the color and texture of the metal, the shape of the silver disk compared to the shape of the rock, and especially the fact that it will always remind me of a wonderful vacation. And believe it or not, it's surprisingly wearable.

So ... it's Saturday now, and I took yesterday off from work to play with my jewelry supplies. So expect more jewelry photos soon!

Wednesday, August 26, 2009

Mimi Kirchner and her wonderful, whimsical creations

Did you like my teacup pincushion and felt doll? Both are from patterns by Mimi Kirchner -- check out this Etsy video about Mimi and her work.


(I know I've been horribly delinquent in posting any of my own projects -- I'll get some photos up here this weekend for sure. I made some great jewelry this past weekend that I'd love to show off as soon as I can get it photographed.)

Saturday, July 4, 2009

The "Jeanne G. Tour" tote bag

I guess it's been a while since I've managed to finish a project ... but I've been on vacation all week, so I've finished a few. Some still haven't been photographed, though, so for today we have just one -- the "Jeanne G. Tour" tote bag.


This bag is based on the "road-trip tote bag" in Alicia Paulson's beautiful book, Stitched in Time. The bag was made as a gift for Jeanne G's birthday, and shows the route from where she was born to where she lives now, with french knots marking the cities where her family members live.


Details:
Main body of the bag is cotton twill, bottom is ultrasuede, both purchased at Mood.
Cotton lining fabric and embroidery thread from Purl Patchwork.
Leather strap for the handles from Leather Impact.
Vintage bakelite button purchased at the D.C. Big Flea Market.

Sunday, May 17, 2009

Another project courtesy of Mimi Kirchner

When the Purl Bee published the pattern for Mimi Kirchner's "purl girl" doll, they included a link to her website, Doll. I added Doll to my list of favorites, and have really been enjoying seeing Mimi's delightful projects. The popularity of the purl girl doll pattern encouraged Mimi to write up a pattern for one of her other projects, the Tiny World Pincushion. Naturally, I couldn't resist buying the pattern as soon as I saw it. And those who know how obsessive I can be about craft projects will not be at all surprised to know that I immediately started looking for suitable teacups to make the pincushions in.

I ended up spending a little more money than I'd intended on teacups, but I did find two really lovely ones, that we're really that expensive. (I'm still hoping to score some really inexpensive thrift shop finds.) So here's my first Tiny World Pincushion -- the Tiny House of Violets.


The tree seems maybe a little too plain, so I may replace it with an embroidered one. Still, I think it's really charming. To play up the purple of the violets in the cup, I made the house yellow (purple's complementary color), with a purple door, then scattered violets across the grass. I pretty much followed the basic pattern for this one, but am looking forward to improvising more on the next one. I've got another cup like this, but with a different type of flower on it. There were a couple more similar ones at that consignment shop ... maybe I'll pay them another visit this week.

If you'd like to see more of these sweet pincushions, check out Doll, or the Flickr group that Mimi started.

There's also a new Flickr group for the purl girl dolls.

Sunday, April 26, 2009

I (heart) Mimi Kirchner and The Purl Bee

... for collaborating to give us all, for free, the pattern to make this wonderful doll.


The pattern appeared in the April 8 post on The Purl Bee. The project journal, with thoroughly illustrated instructions, is here.

Mimi's blog, Doll, shows off lots of her clever, quirky, and whimsical creations. Be sure to check out her Etsy shop, too, for more photos. I'd seen her Tiny World Pincushions at Etsy before, but I hadn't seen her blog until The Purl Bee project.


I could hardly wait to start one of these dolls, and luckily I already had a stash of nice wool felt to work with. All I needed to buy was some embroidery thread and a couple of buttons. Then it was a just a matter of tearing myself away from my yarn for a while in order to sew. The pattern and tutorial are very well-done; I didn't have any trouble at all stitching this sweet doll.

For my first, I pretty much made her just like the originals -- except that I moved the rose from the front of the sash to the back, to camouflage the fact that my sash didn't quite reach all the way around (oops!).


I do plan to personalize her a bit, though, with a small bit of knitting. I'd thought I would make her a sweater, but I'm not sure a sweater would fit well over this dress. So I think I'll probably knit up a little shawl. Next time around, I'll customize the clothes in order to incorporate a sweater into the outfit. Just had an idea .... maybe turn the shoes into ice skates, keep the nice full skirt, and knit her a sweater and scarf and hat ... can't wait to get started!

Sunday, April 5, 2009

That bowl of yarn

So what was that bowl of yarn in the last post?

A couple of weeks ago, I went on a 10-day trip to Colorado. Thinking this was a wonderful opportunity to start a new project, I ordered a sweater's worth of yarn to be delivered directly to Colorado. Sure, I could have finished one of the many projects I have in the works, or started something with yarn I already had ... but I had just fallen in love with the sweater on the back cover of Vogue Knitting (here, if you're on Ravelry), and just had to have it. It would have been a great project, if the yarn had arrived in time. Unfortunately, it took so long for the seller to ship that the yarn wasn't scheduled to arrive until two days before the end of my vacation.

No problem, though, right? I had a pair of socks to work on, plus another ball of Socks that Rock in my suitcase, so I had plenty of knitting to keep me busy.

But then I went to Shuttles, Spindles, and Skeins in Boulder. Wow, what a wonderful store! One of the first things I saw when I walked through the door was the book Beautiful Sheep: Portraits of Champion Breeds. Who would have though portraits of sheep could be so striking? That same table held a variety of Japanese knitting and felting books, something I've rarely found other than online or at Kinokuniya in New York. That was one of the best things about this store -- an amazing collection of books related to all the fiber arts. And years' worth of back issues of fiber-related magazines. I could easily have browsed for hours. And that was before I even started looking at the yarns!

I thought I'd pick up a little project to make up for the fact that I couldn't start my sweater. Then I saw the Koigu rack.


Lots of stores carry Koigu, but very few seem to have much of a selection of the solid colors. SS&S had them, though -- dozens of gorgeous hand-dyed solids. My first thought was that I might pick up some yarn for a couple of pairs of lacy socks. But then I remembered why I really needed some solid-colored Koigu ... the Babette Blanket!


This pattern is in the Spring 2006 issue of Interweave Crochet. I don't even know why I happened to pick up that magazine when I saw it at Barnes and Noble three years ago, but when I saw that blanket I decided to buy the magazine -- notwithstanding the fact that I hadn't crocheted in years. Every once in a while since then, I've pulled out the magazine to look at that beautiful riot of color and contemplate whether I was ready to tackle it.

So I guess all the stars were aligned on that day that I went to SS&S. They had that rack full of Koigu, and the magazine with the pattern in it. And the series "Knit and Crochet Today" had recently piqued my interest in trying crochet again, and given me a bit of a refresher course. It was time for Babette!

I picked out seventeen colors, more or less the same as those used in the original version. I spent hours winding them into balls (since my skein and ball winder were back at home). And I started crocheting. Here's what I've got so far. Isn't it gorgeous?


The blanket is divided into ten modules, and I've finished the first six. (They get larger as you go, though, so I"m not yet half finished). The crocheting is very straightforward, and luckily Knit and Crochet Today taught me how to weave in the ends as I work -- with all these squares, and all these colors, I believe there are approximately 967, 347 yarn ends in this piece! I'm sewing each module together as I finish it, partly because I'm anxious to see the blanket come together, and partly to avoid the daunting task of sewing it all together at the end.

On my project page on Ravelry, I've named this "Memere's blanket," in honor of the grandmother who taught me to crochet when I was a child. My Memere was an expert crocheter, and I'm so glad she gave me the skills to make this beautiful blanket.

Sunday, March 29, 2009

I'm still here ...

... just haven't gotten a chance to post anything for a while, partly because I've been off enjoying a wonderful spring break ski trip. I still don't have much, mainly because I need to take some photos, but I wanted to share this beautiful bowl of wool:


Twenty-two balls of gorgeous Koigu. What's it for? More on that next time ... when I get some more photos taken!

Friday, February 20, 2009

Little Bunny Foo Foo

Little Bunny Foo Foo, hopping through the forest, scooping up the field mice and bopping them on the head. . .

Two years ago, I decided to join the insanity at the Maryland Sheep and Wool Festival by lining up at The Fold to buy some Socks That Rock yarn. Sure, you can buy it online, but I thought it would be fun to see lots of colorways in person. The thing is, there was such a crush of people in the booth, that I got overwhelmed and completely forgot to look for the one color I knew I wanted to see – Little Bunny Foo Foo. (Really, how could you not love a yarn called Little Bunny Foo Foo?) So while I was in line waiting to pay, I saw someone holding a skein, and asked her to pass one out to me. The woman behind me saw the yarn being passed over, and told me that she had used a skein of the same colorway to knit Monkey socks, and that she was really pleased with them. So I made a mental note to check out the Monkey pattern for this yarn.

I seem to buy sock yarn a lot faster than I knit it, though. So finally, nearly two years later, I pulled out my Little Bunny Foo Foo, printed out the pattern, and started on my socks. Monkey turned out to be a great pattern to knit – more interesting than simple ribbing, but not so complicated as to require my full attention.


This is my first completed pair of lace socks (let’s not speak of the other pair, 75% finished, languishing among my UFOs). The design is pretty, but simple enough for a lace novice.


I’m still not sure that I’m ever going to be a big fan of lace knitted in multi-colored yarn, but I do like my Little Bunny Foo Foo Socks.

And that name is going to make me smile every time I wear them.

Saturday, February 14, 2009

Happy Valentine's Day


Pattern: Heart Sachet, by Vicki Sever for Interweave
Yarn: Koigu premium merino
Needles: size 1, bamboo DPNs
Made for Valentine's Day for my mother.

This pattern was a bit of a challenge to get started on, mainly because I have no three-dimensional spatial sense whatsover. But after the first couple of squares were done, it was fairly easy to see how all of the pieces fit together. After square 1, all the subsequent squares are attached by picking up stitches from earlier squares -- the only seaming required is to close up the top. The sachet is filled with lavender, and smells wonderful. I really like the cute, tiny i-cord for the hanging loop.

Happy Valentine's Day!

Sunday, February 1, 2009

O'Keeffe

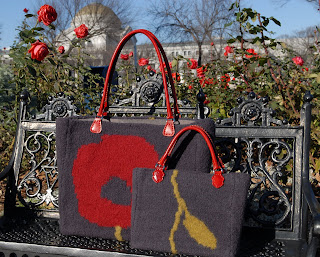
Several years ago, I stayed at a house in Provence that had a little field of poppies out front, and I’ve loved these bright and cheery red flowers ever since. When I decided to knit a bag with a floral design, the poppy came immediately to mind. Once this bag was finished, it reminded me of Georgia O’Keeffe’s paintings of oriental poppies, and so I named it in her honor -- the O'Keeffe.


Because I'd only designed one pattern of my own previously, I decided to experiment with this design by making a smaller version first -- that way, I'd have spent less money on yarn if I decided I didn't like it. I did like it, though, and that experiment gave me the idea of enlarging the bag by simply knitting the larger version with two strands of yarn held together. As a result, the large bag knits up just as quickly as the smaller one, and the extra yarn gives it the extra body you need for a large tote.


For the yarn, I turned to Ella Rae Classic, which has a gorgeous array of colors in a basic worsted weight yarn. The background color is "eggplant" -- a really versatile almost-gray shade of purple. It functions as a neutral, but with a more lively color than a pure gray. It sets off the red flower and green leaf beautifully. The red leather handles are from Grayson E -- expensive, but worth it for a special project.


The bag is knit all in one piece -- starting at the bottom of the stem as seen in the picture above, then wrapping around to the other side, ending with the poppy blossom. After knitting this long rectangle, I picked up stitches for the sides, knit them at right angles to the main section, and then seamed the bag together and felted it.

Would you like to make an O'Keeffe of your own? I've posted the pattern online, and added it to the Ravelry pattern database. Let me know if you make one -- I want to see pictures!

Saturday, January 24, 2009

Make hay while the sun shines

...or for the modern-day blogger, make photos while the sun shines.

I like to take my photos in strong, natural sunlight. That's why the background of most of my fiber projects is the picnic table in my back yard. But strong, natural sunlight has been a scarce occurrence around here lately. The cloudy, gloomy winter days have far outnumbered the clear, sunny ones. So even though I've finished a number of projects, the blog has been neglected because I couldn't get any good pictures.

This afternoon, the sun finally came out! I grabbed the camera, and an armload of projects, and ran outside. But as soon as I got set up, the sun vanished again.

I took everything back indoors, and as soon as I did, the sun came out again.

So back outdoors I went, where I managed to get a quick set of photos taken. I'll be so glad when spring comes, and the sun returns with it!

So ... let's see what we've got.

First, some weaving projects. When I put up my last post, my first woven scarf was still on the loom. Here it is, all finished.


The edges gradually got more even as I worked, slowly getting the knack of making a neat selvedge. I think it's fairly nice for a first project.

For my second project -- another scarf -- I got more adventurous and started experimenting with color patterns. This scarf is woven in two shades of Valley Yarns Stockbridge yarn, periwinkle and chocolate.


This houndstooth check was much easier than I would ever have guessed -- I just alternated two strands of periwinkle with two strands of chocolate in both the warp and the weft. Here's a closeup of the checks.

The next challenge was to try a new fiber and a looser weave. This lightweight little scarf follows directions in the book Weaving Made Easy. It's actually two scarves layered on top of one another.


One uses Kidsilk Haze in "heavenly" for both the warp and weft, while the other uses that same Kidsilk Haze for the warp with a weft of Kidsilk Night in "moonlight." The Kidsilk Night is a new yarn for me -- basicaly Kidsilk Haze with a little bit of sparkle in it. It's really beautiful.

And there's been knitting, too. I continue to work on the Kusha Kusha scarf that seems like it will never be done. Where did I ever get the idea that knitting with thread would be fun? Oh right -- it's because the result is so stunning. I've also finished the knitting portion of the Pillow of Sei Shonagon, and am working on the sewing part.

Some projects have even gotten finished. I found out over the holidays that my niece was going to have a baby, so of course I had to knit something tiny and adorable. I turned to one of my very favorite knitting books, Knitalong. You really should seek out this book if you haven't seen it before -- I find myself wanting to make nearly everything in it, and it's enjoyable reading as well. I finally had a reason to make the adorable Victorian Baby Bonnet.


This sweet little hat took only a couple of nights to make, and the lace pattern is very simple to follow. This one is knit in Rowan RYC silk cotton, in "cucumber," with the edging knit in "peat." Since the contrast color is used for only one row of edging, I had nearly a full ball of brown left. The obvious use for it was to make another hat, this one brown with green edging.


For now, I'm working on a pair of socks -- I'm the 8 millionth person to try out the "Monkey" pattern. Maybe I'll manage to get a photo on the next sunny day.

Thursday, January 1, 2009

A new fiber arts adventure

The book Intertwined has a couple of interesting woven projects using handspun, non-traditional yarns -- a scarf and a vest. Ever since I first saw them, I've been intrigued by the idea of weaving with my handspun yarns. I was curious about the way that non-traditional yarns might look in a woven fabric, and it also seemed like a good way to make small amounts of handspun go farther than with knitting.

So my Christmas wish list this year included a 24-inch Kromski Harp Loom.


Of course, it didn't quite look like this when I found it under the tree -- it took about two hours to go from looking like a box of loom parts to looking like an actual loom. Even with the instructional video, I found it pretty confusing to assemble, but eventually managed to get all the parts in the right place.

I knew I was going to be in the neighborhood of Webs a few days later, so I decided to pick up some yarn there for my first couple of projects. Yarn choice was my first weaving challenge -- with knitting, I'm generally using one yarn at a time, so I'm not used to having to envision how two different yarns will look when worked together. After a full hour in the store, I finally settled on yarn for three scarves. I've got some robin's egg blue and chocolate brown baby alpaca, a pink/brown/cream variegated to mix with pink and brown solids. And for my first project, I picked out two skeins of Cascade heather, in colors 9451 Lake Chelan and 9452 Summer Sky.


It's not exactly an adventurous combination, but it does look pretty nice.

It took quite a while to get from the empty loom to a piece of relatively even weaving, though. There's quite a lot to figure out right up front.

One thing I wish I'd figured out sooner -- which is the front of the loom, and which is the back. I managed to warp the loom backwards and had to rewind the warp to sort it all out. I'm pretty sure I won't make that mistake again!

It took me at least a couple of hours to warp the loom for a scarf, although I'm sure it will be much quicker the next time around. I had almost all of the yarn measured out when I somehow let some of it pop off the warping board, and I had to start over again. It was a little scary holding all that carefully measured and wound yarn on my hand as I tried to figure out how to attach it to the loom, but it all went on pretty smoothly (except for the fact that I attached it the wrong way around, as noted above). My daughter helped, and we managed to get all the yarn on without tangling.

Finally, it was time to wind some weft yarn onto a shuttle and start making fabric. Those first several inches were quite a mess -- wavy rows, loopy selvedges, and uneven spacing between rows. Eventually, though, the edges became straighter and the selvedges became less loopy. Still not exactly professional looking, but much improved.


I've made about three feet of passable fabric so far, and I think this scarf may actually be wearable when it's done. I'm hoping that washing it will work some magic to even everything out, the way blocking does for knitting.

After I finish weaving the yarn I bought at Webs, it'll be time to try out some handspun.