It's been a busy and productive 3-day weekend (I took Friday off from work) -- jewelry, knitting, and spinning. Nothing finished in the knitting category, so no photos there. But here's what I've been spinning:
4 ounces of merino and bamboo top, spun into a 2-ply yarn. Handdyed by Miss Babs, purchased at Fiber Space. I haven't skeined it yet, so I don't know what the yardage is. I've got another entire 4-ounce braid of fiber left to spin. I hadn't done any spinning in quite a while, and my spinning muscles are really aching now! I'll have to give my back a rest for a few days before I tackle that other braid.
Now, the jewelry.
I started out with a beading project, using some of the brass findings that I got at BeadFest.
This is made with a brass bird charm, brass chain, aquamarine beads, and oxidized sterling silver wire.
After the necklace, I started playing with some polymer clay, inspired by a new book that I picked up at BeadFest. It's called Ancient Modern: Polymer Clay + Wire Jewelry, by Ronna Sarves Weltman. Ronna stopped by class last Sunday with some polymer clay pieces that she had made using Objects and Elements bezels, and they were so gorgeous that I couldn't resist buying her book.
Here's my first piece -- a polymer pendant with silver wire, strung (for now) on a silk cord.
I'm not sure about this one yet -- maybe a glaze coat to bring up the color would make me like it more. I think I blended the clay a little too much, so that the colors ran together and lost their vividness.
The next piece combines metal with more polymer clay, in the same color scheme, held together with a brass screw. This one's on a silk ribbon for now, as well, but I haven't really decided how to finish it off. Also, while I like the basic idea, I may redo the polymer pieces.
The final piece of finished jewelry for the weekend is a bracelet, using rubber cord, sterling silver, a brass bezel with glass bead, and sari silk. I can't really claim credit for this design, as it was published in the Handcrafted Jewelry magazine that I bought at -- BeadFest, of course. So it's not original, but it's a great design, and I already had all of the components on hand.
It's Sunday night now, and I've started in on one last piece -- but this one involves resin, so it's going to take a couple of days to get all of the layers poured and cured. Hopefully, I'll have photos for my next post.
...and finally, here are a couple of pairs of cufflinks that I actually made a couple of weeks ago, as a birthday present for my husband. One pair made with NY subway tokens, and the other with 10 franc coins -- neither of which is in circulation any more.
Sunday, August 30, 2009
Saturday, August 29, 2009
BeadFest Philadelphia
Most of what I've posted here has been fiber-related -- knitting, spinning, dyeing, sewing. But this past weekend, I got to spend some time on another hobby that I haven't done much of in a while -- jewelry making.
Taking a class is always a great way to get inspired again, and that's what I did. I took a class called "Rings, Relics, and Riveting," with a wonderful teacher and jewelry artist, Susan Lenart Kazmer. The class was part of BeadFest Philadelphia, a huge bead and jewelry show with lots of classes. So on Saturday, I arrived early to check out the marketplace, where I of course spent more than I'd intended to on materials and supplies.
Then on Sunday, I had my class. Here's the course description:
Then we started using rivets, tiny nut & bolt sets, staples, and prongs to hold rings together. I'd brought along all sorts of odd materials that I thought I might be able to add to a ring, and ended up focusing on a little bag of rocks that I'd brought back from a vacation to Prince Edward Island a few years ago. I made my first PEI rock ring with copper, a pale blue glass bead, and a silver-colored metal spacer bead:
I love the patina that the copper got from heating it with a torch, and the slightly irregular hammered edges of the metal disk. Unfortunately, though, in the process of riveting it all together, I cracked the rock. I haven't had the heart to take it apart yet, but at some point I'll probably put in a new rock to replace the cracked one.
After that, I decided to break out the expensive supplies -- a sheet of sterling silver. I made another ring very similar to the copper one, but this time I'd learned some things about how not to break the stone (give it better support in the metal disk, and don't hammer so hard on the rivet!) Here's the result:
It's kind of ridiculously huge compared to what I'd ordinarily wear as a ring, but I really like the color and texture of the metal, the shape of the silver disk compared to the shape of the rock, and especially the fact that it will always remind me of a wonderful vacation. And believe it or not, it's surprisingly wearable.
So ... it's Saturday now, and I took yesterday off from work to play with my jewelry supplies. So expect more jewelry photos soon!
Taking a class is always a great way to get inspired again, and that's what I did. I took a class called "Rings, Relics, and Riveting," with a wonderful teacher and jewelry artist, Susan Lenart Kazmer. The class was part of BeadFest Philadelphia, a huge bead and jewelry show with lots of classes. So on Saturday, I arrived early to check out the marketplace, where I of course spent more than I'd intended to on materials and supplies.
Then on Sunday, I had my class. Here's the course description:
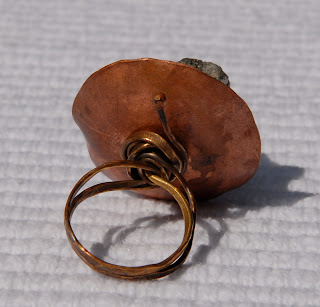
Combine layers of metal sheet, objects, paper, rocks and fiber build unusual wearable rings. Focus on cold joining techniques such as riveting, prongs and staples. Add height and dimension by use of negative and positive space. Fabrication of metal by hand and tools such as disc cutters and forming block.We started with a simple design that involved stringing various types of beads (loosely defined as anything that had a hole in it, or could have a hole drilled into it) onto a long piece of brass wire that was then hammered and shaped into a ring shank. Here's the result of mine, using a hammered copper disk and a chunk of hematite.
Then we started using rivets, tiny nut & bolt sets, staples, and prongs to hold rings together. I'd brought along all sorts of odd materials that I thought I might be able to add to a ring, and ended up focusing on a little bag of rocks that I'd brought back from a vacation to Prince Edward Island a few years ago. I made my first PEI rock ring with copper, a pale blue glass bead, and a silver-colored metal spacer bead:
I love the patina that the copper got from heating it with a torch, and the slightly irregular hammered edges of the metal disk. Unfortunately, though, in the process of riveting it all together, I cracked the rock. I haven't had the heart to take it apart yet, but at some point I'll probably put in a new rock to replace the cracked one.
After that, I decided to break out the expensive supplies -- a sheet of sterling silver. I made another ring very similar to the copper one, but this time I'd learned some things about how not to break the stone (give it better support in the metal disk, and don't hammer so hard on the rivet!) Here's the result:
It's kind of ridiculously huge compared to what I'd ordinarily wear as a ring, but I really like the color and texture of the metal, the shape of the silver disk compared to the shape of the rock, and especially the fact that it will always remind me of a wonderful vacation. And believe it or not, it's surprisingly wearable.
So ... it's Saturday now, and I took yesterday off from work to play with my jewelry supplies. So expect more jewelry photos soon!
Wednesday, August 26, 2009
Mimi Kirchner and her wonderful, whimsical creations
Did you like my teacup pincushion and felt doll? Both are from patterns by Mimi Kirchner -- check out this Etsy video about Mimi and her work.
(I know I've been horribly delinquent in posting any of my own projects -- I'll get some photos up here this weekend for sure. I made some great jewelry this past weekend that I'd love to show off as soon as I can get it photographed.)
Subscribe to:
Posts (Atom)